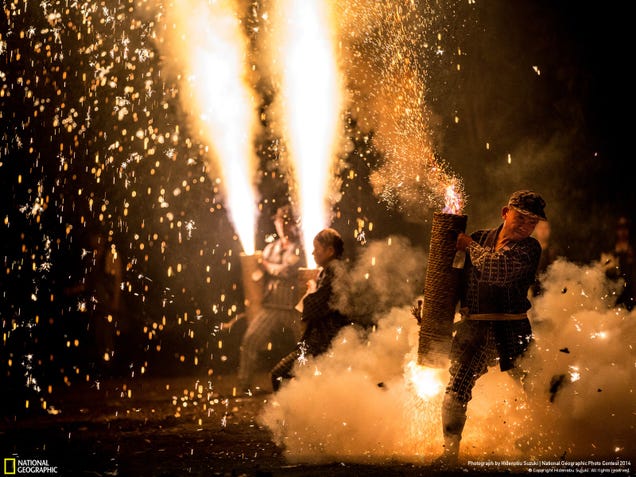
Wednesday, April 15, 2015

Friday, March 27, 2015

CityScape

Model: Nikon D5000
Lens: Stock 18-55mm

Shutter:1/200
F-Stop:5.6
ISO:6400

Shutter:1/125
F-Stop:5.6
ISO:6400

Shutter: 1/100
F-Stop: 3.5
ISO: 100

Shutter: 1/100
F-Stop: 4.8
ISO: 100

Shutter:1/100
F-Stop:5.6
ISO:100

Shutter:1/100
F-Stop:3.5
ISO:100

Shutter: 1/400
F-Stop: 4.5
ISO: 100
Shutter: 1/100
F-Stop: 4.8
ISO: 400

Friday, March 6, 2015

Pet Portrait Plan

1. What type of pet will you photograph?
I will take photos of my dog, which is a chocolate lab, and my brother's, which is a great dane.

2. Where will you shoot?
My house, and outside at a park near my house.

3. What type of lighting will you use?
Natural, and occasionally a light.

4. What equipment will you need?
My camera and a tripod.

5. What challenges will you encounter?
Capturing my brother's dog. He is very active.

6. How will you overcome these challenges?
I will try and use a higher shutter speed or treats.

7. Post an example for inspiration for your shoot. Explain what you like about the photo and how you will attempt to emulate or use for inspiration.

I like this photo because it seems very candid, and the dog is not directly facing the camera, which shows the depth of the dogs nose.

Wednesday, March 4, 2015

HDR Assignment

1. What does HDR stand for?
    High Dynamic Range
2. In your own words, explain what makes an HDR photo an HDR photo?
    Multiple exposures to ensure a different range of colors for each part of the photo
3. What is bracketing?
    Taking multiple exposures of the same scene
4. What software can you use to produce an HDR image?
    Most photo editing software will work, all you need is to combine the good exposures
5. When selecting layers, what do you have to be careful about when creating your HDR photos?
    You have to be careful when you select the areas for the good exposure because you want to make              the photo look natural.
6. Save your favorite HDR photo on your blog.
   

Monday, March 2, 2015

Thursday, February 26, 2015

Landscape Preview

Tip 1: Think about horizons

Tip 2: Work with the weather

Tip 3: Consider the sky

1.
Photo by Florent Courty
2.
Photo by deep21
3.
Photo by Michal Ostrowski

Equipment:
Camera
Tripod
Neutral Density filter
Lenses
Spare batteries

Location:
I would like to take desert landscape photos, but west Texas is too far away so landscapes of parks will have to do.
Mary Moore Searight Park, or other nearby parks

Friday, February 20, 2015

Studio Shoot

Set 1 - One light
Shadowless

Butterfly

Loop

Rembrandt

Split


Set 2 - Two lights
Shadowless

Butterfly

Loop

Rembrandt

Split


Set 3 - Three lights
Shadowless

Butterfly

Loop

Rembrandt

Split

Friday, February 13, 2015

SmugMug questions

1. Content Blocks
How do you add Content Blocks to your site?
You drag it from the list of blocks.

2. Content Types
What are the eight different types of content you can add?
Photos, Navigation, Video, Design, Text, Social, Discovery, HTML& CSS

3. Photos
When you add photos to SmugMug, which are the FOUR different ways you can display them? Briefly explain what each method does.
Single, Multiple, Slideshow, Carousel

4. Navigation
What are the SEVEN different types of Navigation items you can add to your SmugMug account? Briefly explain what each does.
Menu- makes a pane used to navigate your items
Galleries- displays a gallery
Folders- displays a folder
Pages- displays a page
Folders, Galleries and Pages- displays all types of content levels
Breadcrumb- links the homepage and the current page
Featured Events- features an event

5. Design Elements
What kinds of design elements can you add?
A logo and a separator.

6. Colorspace
What "Colorspace" should your images be processed in to be uploaded to SmugMug?
sRGB

7. Cropping
Should you crop your images before uploading to SmugMug? Why?
No, because you can let the customer choose the cropping size.

8. Resolution
What is the minimum resolution size for an 8" by 10" print?
750x935

Friday, January 30, 2015

Light Basics and vocabulary

For each technique you should explain the following: 
  • 1. What effect does it create?
  • 2. Why use it?
  • 3. How many lights or light sources?

The Five Basic Lighting Techniques

Butterfly (or Paramount) -- 
1. This is very similar to the loop type, but the shadows are all cast down.
2. It is very flattering.
3. At the very least, one light.
Loop -- 
1. It creates a nice looking illuminated subject, with a bit more light on one side of the face.
2. Used for formal and professional looking photos.
3. Requires at least two lights.
Rembrandt -- 
1. One-sided, with a small triangle of light on the darker side, with the subject facing the light.
2. It creates a dramatic effect without the harsh lighting of a split light, can be used for ambiguity.
3. At the very least, one
Split -- 
1. This creates a harsh shadow on one side of the face, split symmetrically down the face.
2. For dramatic effect, harsher than Rembrandt, can be used to emphasize duality of the subject.
3. At the very least, one.
Broad and Short --
1. Similar to Rembrandt, only the subject faces away from the light.
2. Can be used to show breadth in the subject's face. 
3. At the very least, one. 

Thursday, January 15, 2015

Flash Photography Basic Concepts

1. Every flash photograph is two exposures in one
2. Fill flash can be used when subject is backlit or side lit to eliminate silhouettes or shadows
3. Flash exposure is not affected by shutter speed.
4. Flash illumination is dramatically affected by distance.
5. Your camera measures ambient light and flash illumination separately.
6. With automatic flash metering, the flash illumination is measure after the shutter buttons pressed, and the flash out put is adjusted accordingly.
7. Every SLR camera with a mechanical shutter box has a maximum flash sync shutter speed. The top speed for our cameras is 1/200
8. Harsh lighting, washed out subjects and red eye can be eliminated by using diffusers and light bouncing.
9. It is possible to change the order of when the flash fires using "Rear Curtain Sync."
10. Removing the flash from the top of the camera helps eliminate red eye and unflattering shadows.

Monday, January 5, 2015

Year in Photos: 2014

1. Photojournalism
2. Light as a subject
3. Mostly artificial, many light sources, the photographer used light as the subject in this photo.
4. This photographer most likely used a high shutter speed and continuous shoot to capture this quick event.

1. Portrait
2. Simplicity
3. Artificial, most likely more than one, and they used their own arrangement of lights for this to get a good balance.
4. The photographer setup their lights to light their subject like such.

1. Cityscape
2. Simplicity
3. Natural, the sun, the photographer used the time of day to have the clouds diffuse the light.
4. The photographer could have waited for this exact time.
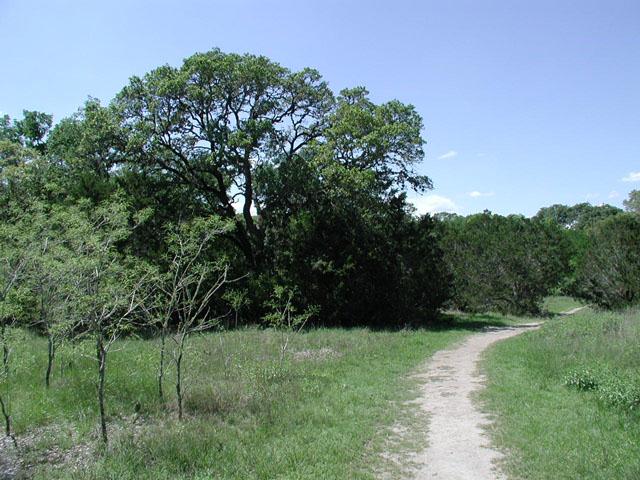
1. Landscape
2. Depth of field.
3. Natural, the sun, this could not have been done at night, so there is that.
4. The photographer must have been in a helicopter to get this angle.

1. Photojournalism
2. Depth, framing
3. Artificial, many light sources, the lights prevail through the smoke and dust, lighting the launch pad.
4. The photographer took this remotely, using a timer to calculate the exact time of launch.

1. Photojournalism
2. Cropping
3. Mixed, possibly many light sources, 
4. First, they had to be allowed into the funeral, and then they had to wait for the officer to go up to the casket.
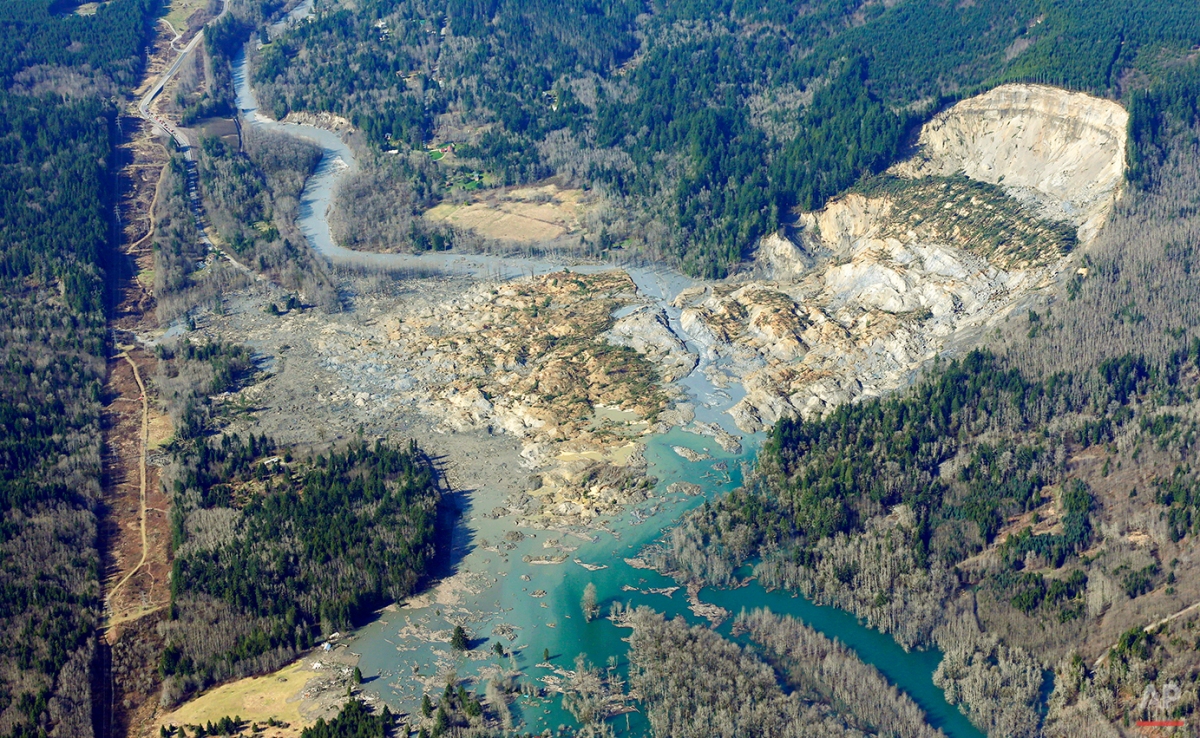
1. Landscape
2. Circular Composition
3. Natural, the sun, the light shows the fully enveloped explosion.
4. This photo had to be taken from a helicopter mere moments after it's conception.